How To Implement Google Maps Functionality Into Java App
If you're developing a retail app, adding Google Maps can make it much easier for customers to find your shops. For a delivery service, Google Maps is also a must to let users choose destinations and check delivery progress. Maps are universal, and if you're wondering how to add Google Maps to Android app, this article is for you.
If you want to find out how to integrate Apple Maps in an application, check out our article on iOS map integrations. And in case you're hesitating about which mapping solution to choose, we can offer a review of Google Maps and Apple Maps. Android Google Map programming isn't hard, as the documentation is very clear and covers most of the use cases.
But for now, let's look at how to deal with Google Maps in your Android app.
How to create a new project with Google Maps
These instructions will show you how to integrate Google Maps in a new project, which means that there won't be anything except for the map. If you want to integrate Google Maps into an existing project, you can skip right to the next tutorial.
Let's see how to create a new project and integrate Google Maps.
Step 1. Install the Google Play Services SDK
Add Google Play services to Android Studio. To make the Google Play services APIs available to your app:
1. Open the build.gradle file inside your application module directory.
2. Add a new build rule under dependencies for the latest version of play-services, using one of the APIs listed below.
Implementation 'com.google.android.gms:play-services-maps:+ googlePlayVersion' (other Google Play API
https://developers.google.com/android/guides/setup)
3. Save the changes and click Sync Project with Gradle Files in the toolbar.
4. If you receive an error, check that your top-level build.gradle contains a reference to the google() repo or to maven.
Location-based app development services
Are you planning to use location in your mobile solution? We'll help your app achieve its fullest potential with maps and routes!
Step 2. Create a new Google Maps project
These are the steps to create a new project with Google Maps activity:
1. Start Android Studio.
2. Start a new project::
- Click Start a new Android Studio project in the Welcome to Android Studio dialog
- If you don't see this dialog, then click File –> New –> New Project.
3. Fill in the app name, company domain, and location.
4. Choose form factors, for example Phone and Tablet.
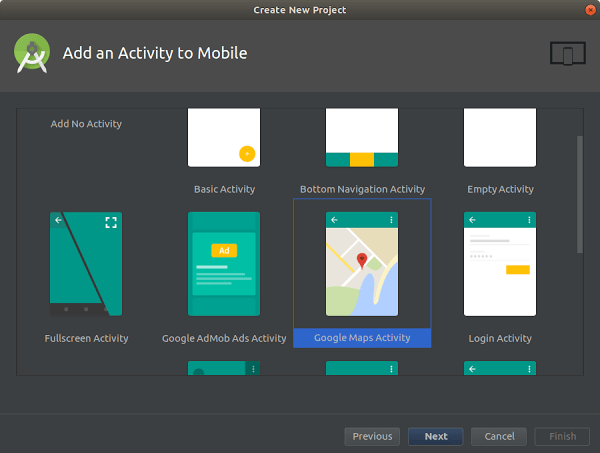
5. Select the Google Maps Activity in the Add an Activity to Mobile dialog.

6. After filling in the activity name and title, click Finish. Don't touch the default values – they're okay.
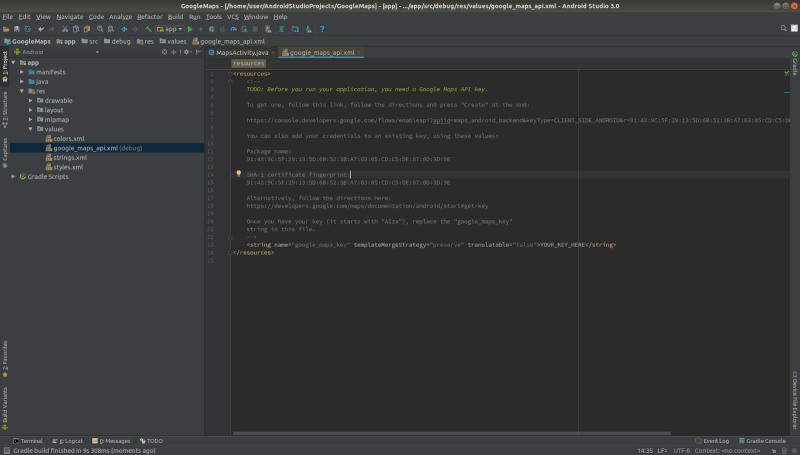
After a few seconds, your project will be built by Gradle. Then you'll see google_maps_api.xml and the MapsActivity.java files in the editor.
Note!
Before you try to run the app, you'll need do get an API key. You can find instructions on how to do this in your google_maps_api.xml file, and we will explain how to do it in more detail in the next paragraph.

Step 3. Get a Google Maps API key
The Android Maps API is used to access Google's servers, and there are several ways you can get a key. An API key is free and supports any number of users.
- The easiest way to get a key is to use the link provided in the google_maps_api.xml file that Android Studio created for you:
1. Copy the link and paste it into your browser. It will direct you to the Google API Console and you won't have to fill in anything by yourself.
2. Select a project you've created before or create a new one.
3. Create an Android-restricted API key for your project.
4. Copy the API key, go back to Android Studio, and paste it into the element in the google_maps_api.xml file.
- Another option for getting an API key is this:
Use the credentials provided in the google_maps_api.xml file that Android Studio created for you:
1. Copy the credentials provided in the google_maps_api.xml file.
2. Go to the Google API Console in your browser.
3. Use the copied credentials to add your app to an existing API key or to create a new API key.
Location-based app development services
Are you planning to use location in your mobile solution? We'll help your app achieve its fullest potential with maps and routes!
Step 4. Check your code
Now, when everything is set up, look at the code and check these files in your project:
The XML layout file
You can find the XML layout file at res/layout/activity_maps.xml. It should have this code in it:
fragment xmlns:android="http://schemas.android.com/apk/res/android" xmlns:tools="http://schemas.android.com/tools" android:layout_width="match_parent" android:layout_height="match_parent" android:id="@+id/map" tools:context=".MapsActivity" android:name="com.google.android.gms.maps.SupportMapFragment"
The maps activity Java file
MapsActivity.java is the file that's responsible for the maps activity. Here's the code you should find in it:
import android.os.Bundle; import android.support.v4.app.FragmentActivity; import com.google.android.gms.maps.CameraUpdateFactory; import com.google.android.gms.maps.GoogleMap; import com.google.android.gms.maps.OnMapReadyCallback; import com.google.android.gms.maps.SupportMapFragment; import com.google.android.gms.maps.model.LatLng; import com.google.android.gms.maps.model.MarkerOptions; public class MapsActivity extends FragmentActivity implements OnMapReadyCallback { private GoogleMap mMap; @Override protected void onCreate(Bundle savedInstanceState) { super.onCreate(savedInstanceState); setContentView(R.layout.activity_maps); SupportMapFragment mapFragment = (SupportMapFragment) getSupportFragmentManager() .findFragmentById(R.id.map); mapFragment.getMapAsync(this); } @Override public void onMapReady(GoogleMap googleMap) { mMap = googleMap; // Add a marker in Sydney, Australia, and move the camera. LatLng sydney = new LatLng(-34, 151); mMap.addMarker(new MarkerOptions().position(sydney).title("Marker in Sydney")); mMap.moveCamera(CameraUpdateFactory.newLatLng(sydney)); } } If you don't see this code in the file, just copy and paste it in after the package name.
Integrating Google Maps into an existing project
If you already have an application and you just want to add maps to it, this set of instructions will help you do so.
Map Objects
Maps are represented in the API by the GoogleMap and MapFragment classes.
Follow these steps to add a map:
1. Follow the steps in the project configuration guide to get the API, obtain a key, and add the required attributes to your Android manifest. (You only need to do this once.)
2. Add a <fragment> element to the layout file for the Activity.
3. Get a GoogleMap object that's a representation of a map. You can modify it according to your needs. To get to it, you'll need to implement the OnMapReadyCallback interface with the help of the onMapReady callback method.
4. Register the callback by calling getMapAsync() on the fragment.
We'll explain each step in detail below.
1. Add a fragment
Add a <fragment> element to the activity's layout file to define a Fragment object.
In this element, set the android:name attribute to com.google.android.gms.maps.MapFragment. This will attach a MapFragment to the activity.
Here's where you can find the <fragment> element:
You can also add a MapFragment to an Activity in your code. To do this, create a new MapFragment instance, then call FragmentTransaction.add() to add the Fragment to the current Activity:
mMapFragment = MapFragment.newInstance(); FragmentTransaction fragmentTransaction = getFragmentManager().beginTransaction(); fragmentTransaction.add(R.id.my_container, mMapFragment); fragmentTransaction.commit();
2. Add map code
The OnMapReadyCallback interface is useful if you want to work with a map in your application. The most common way to add a map to an application is to set a callback on a MapFragment. You can also use MapView object for that.
First, implement a callback interface:
public class MainActivity extends FragmentActivity implements OnMapReadyCallback { ... } Use this code in your Activity's onCreate() method to set the layout file as the content view:
@Override public void onCreate(Bundle savedInstanceState) { super.onCreate(savedInstanceState); setContentView(R.layout.main); ... } Get a handle to the fragment by calling FragmentManager.findFragmentById(), passing the resource ID of your element.
Notice that when you build the layout file, the resource ID R.id.map is added automatically to the Android project.
Then use getMapAsync() to set the callback on the fragment.
MapFragment mapFragment = (MapFragment) getFragmentManager() .findFragmentById(R.id.map); mapFragment.getMapAsync(this)
Use the onMapReady(GoogleMap) callback method to get a handle to the GoogleMap object.
When the map is ready for use, the callback will be triggered. Then you'll be able to use the GoogleMap object. This will allow you to add markers or view options.
Here's an example of how to add a marker:
@Override public void onMapReady(GoogleMap map) { map.addMarker(new MarkerOptions() .position(new LatLng(0, 0)) .title("Marker")); } 3. Adding the map object
Maps that are displayed with the help of the API look essentially the same as Google Maps for mobile (GMM). However, there are a few differences:
- API map tiles don't have any personalized content like smart icons, for example.
- Not all icons are clickable, but markers that you add can be clicked on.
The API supports not only map functions but also a wide range of interactions within the Android UI model – for example, gestures.
The GoogleMap class is what you'll use to work with a map object. It automatically:
- Connects to the Google Maps service
- Downloads map tiles
- Displays tiles on the device screen
- Displays zoom, pan and other controls
- Responds to these controls
Location-based app development services
Are you planning to use location in your mobile solution? We'll help your app achieve its fullest potential with maps and routes!
Map types
The Google Maps API offers many types of maps so you can choose the one that suits your app best. For example, if you have a travel app, you'll probably need a road map to show routes. Other use cases may require a satellite view or even no map at all. You'll also be able to find out how to customize route on Google Maps app from documentation.
Here are the types of maps you can choose from:
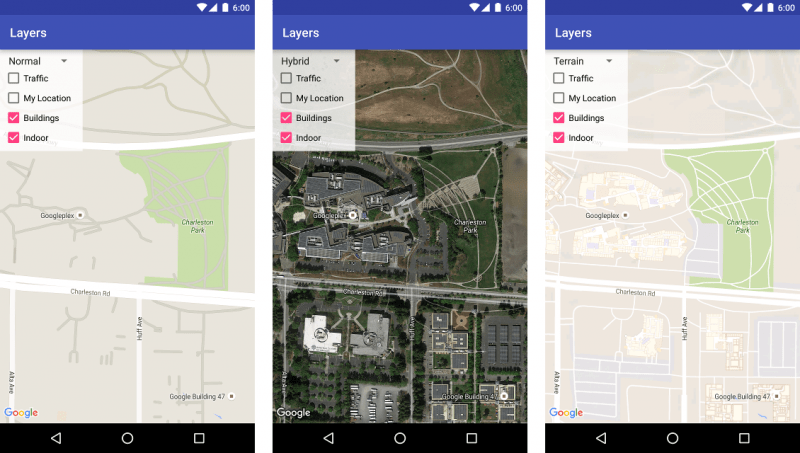
Normal – a typical road map that shows roads, some human-built features, and important natural features like rivers; road and feature labels are also visible.
Hybrid – a satellite photograph with roads added; road and feature labels are also visible.
Satellite – photograph data from satellites; road and feature labels are not visible.
Terrain – contains topographic data including colors that show different map features like water or vegetation, contour lines and labels, and perspective shading; some roads and labels are also visible.
None – shows no tiles; the map will be rendered as an empty grid with no tiles loaded.
Set the map type
To set the type of map, call the GoogleMap object's setMapType() method, passing one of the type constants defined in GoogleMap. For example, here's how to display a hybrid map:
GoogleMap map; ... // Sets the map type to be "hybrid" map.setMapType(GoogleMap.MAP_TYPE_HYBRID);
The image below shows a comparison of normal, hybrid, and terrain maps for the same location:

Problems and how to solve them
When you implement Google Maps into an Android app, you probably won't face serious obstacles. Google Maps is a very complex technology, and Google handles most of the errors that developers may make. Thus, it's pretty easy to integrate Google Maps once you know the basics.
However, there are some nuances that you need to know.
1. Permissions
You'll need two permissions to work with a map that has access to a user's location:
- android.permission.INTERNET
- android.permission.ACCESS_FINE_LOCATION
Note that ACCESS_FINE_LOCATION is a dangerous permission – in Android versions 6.0 and above, the app needs to request this permission while the app's running. A user may or may not give permission, so you need to keep that in mind.
2. Marker customization
Marker customization lets you change the shape and color of a marker to make it suit your app. For example, if you develop an app for a retailer, you can make markers look like the shop's logo.
For this, you'll need a BitmapDescriptor object. You can get one with the help of the BitmapDescriptorFactory object.
Here's how to create a standard marker:
map.addMarker(new MarkerOptions().position(new LatLng(0, 0)).icon( BitmapDescriptorFactory.defaultMarker()));
And how to create a custom marker:
map.addMarker(new MarkerOptions().position(new LatLng(10, 10)).icon( BitmapDescriptorFactory.fromResource(R.drawable.ic_launcher)));
BitmapDescriptorFactory also has other methods to get the marker icon:
– fromAsset, from the Assets folder
– fromBitmap, from a Bitmap object
– fromFile, from internal storage
– fromPath, from a specified path
There are some other colors available with the defaultMarker method,all of which are described in Help.
This is an example of a standard green marker:
map.addMarker(new MarkerOptions().position(new LatLng(-10, -10)).icon( BitmapDescriptorFactory .defaultMarker(BitmapDescriptorFactory.HUE_GREEN)));
In this article I showed you how to integrate maps in Android app. If you have any questions on how to integrate Google Maps into your Android app or if you want to develop an LBS application, contact Mobindustry for more details and some advice.
Article written by:
Dmitriy Harmashev
How To Implement Google Maps Functionality Into Java App
Source: https://www.mobindustry.net/blog/tips-on-integrating-google-maps-in-an-android-app/
Posted by: mckenneywhered.blogspot.com

0 Response to "How To Implement Google Maps Functionality Into Java App"
Post a Comment